
UEFI开发学习19 – EFI APP
最简单的东西往往容易被忽略,但恰恰又是非常重要的。这个系列写了快20篇了,才想起来少写了这一篇...
序言
对于学编程的人来说,首先学习的就是在屏幕如何打印一行文字,这一行文字就是编程界传统的“Hello World!”,象征着正式踏入编程的第一步。同样的,我们现在使用UEFI在EFI Shell也打印一行“Hello World!”
APP类型
在打印之前,先介绍下写UEFI APP的方式,可分为2种:调用C库与调用标准UEFI库。
第一种适用于编写调用C语言标准库的代码,当然也包括UEFI库。在UDK中,包含了一个StdLib的文件夹,存放的就是C语言标准库。为了方便开发者调用 StdLib,UDK还集成了一个 AppPkg,它加载了StdLib,开发者在这个Package里直接写UEFI APP即可,前面我移植LVGL库就是用这种方式。目前最新的EDK2代码已经移除了AppPkg和StdLib,要调用的话只能自己加上,或者使用UDK,最新一版只更新到UDK2018,也是我现在一直在使用的版本。
第二种则是写标准的UEFI APP,直接调用UEFI或EDK2中实现的库。这种只适用于小型的APP开发,因为大型的APP必定会使用各种第三方库,而第三方库很少专门为UEFI编写的。这种方式的优点就是编写比较简单,代码可放置到任何目录。
APP组成
UEFI APP实际上也是一个由INF管理的代码模块,不管是 UEFI Driver、UEFI APP 还是Library,格式都是一致的,由一个c文件(包含.c和.h文件,统称c文件)和inf文件组成。为了支持多种语言,uni文件也有可能包含在内。此外,在EDK2的代码中,inf模块还可以包含编译好的efi文件,甚至是lib文件等,这篇文章暂且不讨论。
模块内的各种文件都有其各自的作用,如C语言文件负责逻辑实现,inf文件负责描述该模块的组成、类型、编译方式等、uni则用于存储Unicode字符串。
EFI模拟器
EFI的APP写出来后如何验证呢?最直接的方法是将APP复制到U盘,然后接到电脑运行。这种方法并不方便,所以可以用模拟器的方法。UEFI的代码中,提供了一个模拟器 Nt32 / Emulator,它是比较简单的模拟EFI执行环境,程序执行时只能进行单纯的软件操作,不能有读写硬件的操作,如读写IO,内存等,否则将造成模拟器异常关闭。如果要进行硬件操作的实验,那就需要使用虚拟机了,如 QEMU,virtual box 等。
本篇文章基于 UDK2018 + VS2015 做的实验,Python建议安装3.8.5。为了更具通用性,EFI模拟器使用的是 Emulator 而不是 Nt32,因为在EDK2代码中,NT32已经被废弃了。
在做实例之前请先编译EmulatorPkg,命令如下:
build -p EmulatorPkg\EmulatorPkg.dsc -t VS2015x86 -a X64
创世纪
先看下用标准UEFI写的HelloWorld。UDK/EDK2的MdeModulePkg\Application目录下,有一个HelloWorld的示例,打开HelloWorld.c,可看到入口函数,如下:
EFI_STATUS
EFIAPI
UefiMain (
  IN EFI_HANDLE        ImageHandle,
  IN EFI_SYSTEM_TABLE  *SystemTable
  )
{
  UINT32 Index;

  Index = 0;

  //
  // Three PCD type (FeatureFlag, UINT32 and String) are used as the sample.
  //
  if (FeaturePcdGet (PcdHelloWorldPrintEnable)) {
    for (Index = 0; Index < PcdGet32 (PcdHelloWorldPrintTimes); Index ++) {
      //
      // Use UefiLib Print API to print string to UEFI console
      //
      Print ((CHAR16*)PcdGetPtr (PcdHelloWorldPrintString));
    }
  }

  return EFI_SUCCESS;
}
该入口函数与其它类型的INF模块是一样的,UefiMain可自定义,但要与INF文件中的ENTRY_POINT保持一致!为了方便演示,把函数改成如下所示,用最简单的方法实现打印一个“Hello World!”
EFI_STATUS
EFIAPI
UefiMain (
  IN EFI_HANDLE        ImageHandle,
  IN EFI_SYSTEM_TABLE  *SystemTable
  )
{
  Print(L"Hello World!");

  return EFI_SUCCESS;
}
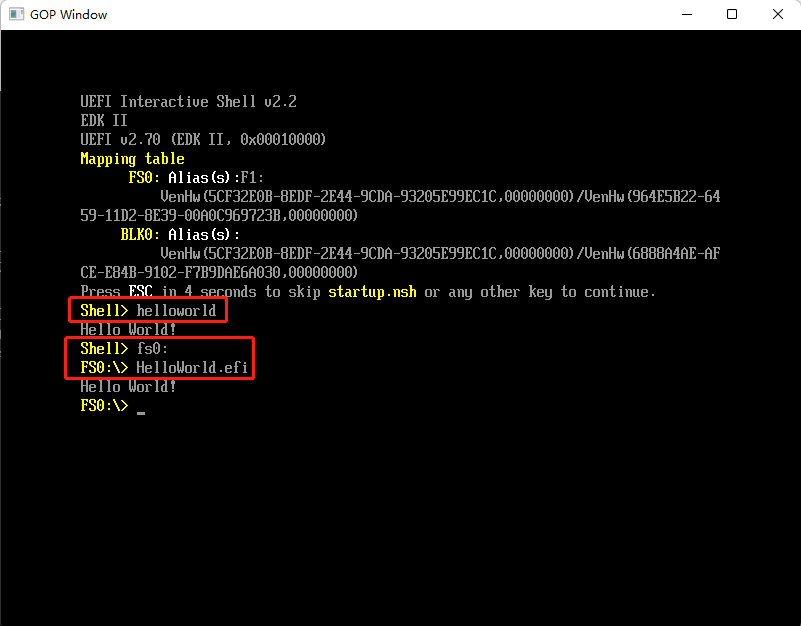
接着重新编译EmulatorPkg,该INF将会被一起编译,Build\EmulatorX64\DEBUG_VS2015x86\X64 目录下可找到编译出来的HelloWorld.efi文件,它就是一个可执行文件,双击该目录下的WinHost.exe打开模拟器,输入HelloWorld即可执行。这里要说一下的是,模拟器默认会把Build\EmulatorX64\DEBUG_VS2015x86\X64这个编译生成目录当成一个磁盘,映射成FS0这个盘符,当执行根目录程序的时候,无需切换盘符也可以执行。
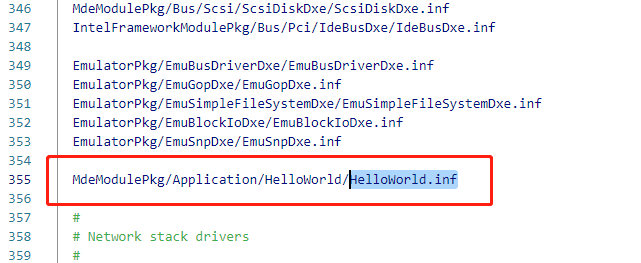
HelloWorld这个实例怎么会被EmulatorPkg编译的呢?因为在EmulatorPkg\EmulatorPkg.dsc文件中,HelloWorld.inf 被加进去编译了,搜索“hello”便可找到此模块。如果自己写一个APP,也可以将INF放在此处。
最终执行结果如下:
到这一步的时候,说明已经正式踏入UEFI开发的大门了!
再来探究下纯C语言写的程序,在AppPkg\Applications 中,可看Main这个例子:
#include  <stdio.h>

/***
  Demonstrates basic workings of the main() function by displaying a
  welcoming message.

  Note that the UEFI command line is composed of 16-bit UCS2 wide characters.
  The easiest way to access the command line parameters is to cast Argv as:
      wchar_t **wArgv = (wchar_t **)Argv;

  @param[in]  Argc    Number of argument tokens pointed to by Argv.
  @param[in]  Argv    Array of Argc pointers to command line tokens.

  @retval  0         The application exited normally.
  @retval  Other     An error occurred.
***/
int
main (
  IN int Argc,
  IN char **Argv
  )
{

  puts("Hello there fellow Programmer.");
  puts("Welcome to the world of EDK II.");

  return 0;
}
语法跟C语言一模一样,在这里写的程序便可以随心所欲调用C库了!
运行参数
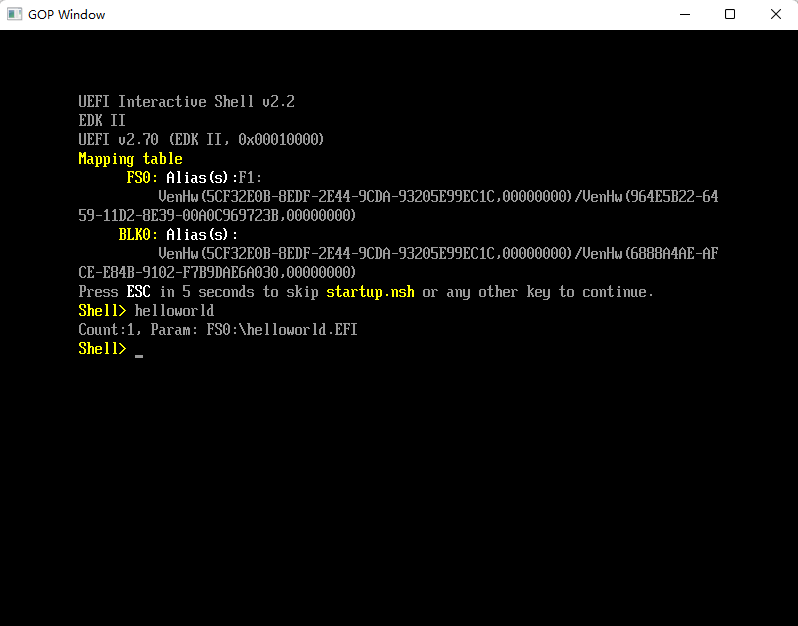
在上述的第一个例子中,入口参数是一个UEFI标准的接口,是不能直接获取运行参数的,而纯C语言的写法则不会有此问题。有什么方法获取运行参数呢?UEFI的代码中已经在ShellLib中实现了此功能,直接调用它的库即可,用来获取运行参数的使用的是 gEfiShellParametersProtocol 。下面修改第一个例子中的代码,演示如何获取运行参数:
/** @file HelloWorld.c
  This sample application bases on HelloWorld PCD setting
  to print "UEFI Hello World!" to the UEFI Console.

  Copyright (c) 2006 - 2016, Intel Corporation. All rights reserved.<BR>
  This program and the accompanying materials
  are licensed and made available under the terms and conditions of the BSD License
  which accompanies this distribution.  The full text of the license may be found at
  http://opensource.org/licenses/bsd-license.php

  THE PROGRAM IS DISTRIBUTED UNDER THE BSD LICENSE ON AN "AS IS" BASIS,
  WITHOUT WARRANTIES OR REPRESENTATIONS OF ANY KIND, EITHER EXPRESS OR IMPLIED.

**/

#include <Uefi.h>
#include <Library/PcdLib.h>
#include <Library/UefiLib.h>
#include <Library/UefiApplicationEntryPoint.h>
#include <Library/ShellLib.h>

//
// String token ID of help message text.
// Shell supports to find help message in the resource section of an application image if
// .MAN file is not found. This global variable is added to make build tool recognizes
// that the help string is consumed by user and then build tool will add the string into
// the resource section. Thus the application can use '-?' option to show help message in
// Shell.
//
GLOBAL_REMOVE_IF_UNREFERENCED EFI_STRING_ID mStringHelpTokenId = STRING_TOKEN (STR_HELLO_WORLD_HELP_INFORMATION);

/**
  The user Entry Point for Application. The user code starts with this function
  as the real entry point for the application.

  @param[in] ImageHandle    The firmware allocated handle for the EFI image.
  @param[in] SystemTable    A pointer to the EFI System Table.

  @retval EFI_SUCCESS       The entry point is executed successfully.
  @retval other             Some error occurs when executing this entry point.

**/
EFI_STATUS
EFIAPI
UefiMain (
  IN EFI_HANDLE        ImageHandle,
  IN EFI_SYSTEM_TABLE  *SystemTable
  )
{
  CHAR16 **Argv;
  UINTN Argc;

  Argc = gEfiShellParametersProtocol->Argc;
  Argv = gEfiShellParametersProtocol->Argv;

  Print(L"Count:%d, Param: %s\n\r", Argc, Argv[0]);

  return EFI_SUCCESS;
}
## @file
#  Sample UEFI Application Reference EDKII Module.
#
#  This is a sample shell application that will print "UEFI Hello World!" to the
#  UEFI Console based on PCD setting.
#
#  It demos how to use EDKII PCD mechanism to make code more flexible.
#
#  Copyright (c) 2008 - 2018, Intel Corporation. All rights reserved.<BR>
#
#  SPDX-License-Identifier: BSD-2-Clause-Patent
#
#
##

[Defines]
  INF_VERSION                    = 0x00010005
  BASE_NAME                      = HelloWorld
  MODULE_UNI_FILE                = HelloWorld.uni
  FILE_GUID                      = 6987936E-ED34-44db-AE97-1FA5E4ED2116
  MODULE_TYPE                    = UEFI_APPLICATION
  VERSION_STRING                 = 1.0
  ENTRY_POINT                    = UefiMain

#
#  This flag specifies whether HII resource section is generated into PE image.
#
  UEFI_HII_RESOURCE_SECTION      = TRUE

#
# The following information is for reference only and not required by the build tools.
#
#  VALID_ARCHITECTURES           = IA32 X64 EBC
#

[Sources]
  HelloWorld.c
  HelloWorldStr.uni

[Packages]
  MdePkg/MdePkg.dec
  MdeModulePkg/MdeModulePkg.dec
  ShellPkg/ShellPkg.dec

[LibraryClasses]
  UefiApplicationEntryPoint
  UefiLib
  PcdLib
  ShellLib

[FeaturePcd]
  gEfiMdeModulePkgTokenSpaceGuid.PcdHelloWorldPrintEnable   ## CONSUMES

[Pcd]
  gEfiMdeModulePkgTokenSpaceGuid.PcdHelloWorldPrintString   ## SOMETIMES_CONSUMES
  gEfiMdeModulePkgTokenSpaceGuid.PcdHelloWorldPrintTimes    ## SOMETIMES_CONSUMES

[UserExtensions.TianoCore."ExtraFiles"]
  HelloWorldExtra.uni
版权声明:
作者:bin
链接:https://ay123.net/mystudy/uefi/1266/
来源:爱影博客
文章版权归作者所有,未经允许请勿转载。

共有 0 条评论