
UEFI开发学习10 – 中文显示(Ⅰ)
前言
UDK的源码中默认是不支持中文字体显示的,有需要的话需要自己添加。显示中文字库的方法有两种,分别适用于不同的场景。第一种是将中文字库转换成数组,然后使用
点阵原理
以上提到的两种方法中都需要生成中文字库,怎么生成呢?原理是什么?
生成的话较简单,使用我之前发布的工具即可(https://ay123.net/share/865/),这里主要是认识一下字库生成的原理。以生成“十”字的字库来说,首先确定生成字体的大小,如宽10,高10,单位是像素,如下图:
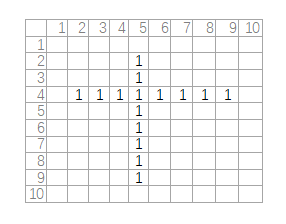
图中为1的部分表示在这个10x10的阵列中存在一个像素点,用一个10x10的C语言数组可表示为
array[10][10] = {
{0, 0, 0, 0, 0, 0, 0, 0, 0, 0},
{0, 0, 0, 0, 1, 0, 0, 0, 0, 0},
{0, 1, 1, 1, 1, 1, 1, 1, 1, 0},
{0, 0, 0, 0, 1, 0, 0, 0, 0, 0},
{0, 0, 0, 0, 1, 0, 0, 0, 0, 0},
{0, 0, 0, 0, 1, 0, 0, 0, 0, 0},
{0, 0, 0, 0, 1, 0, 0, 0, 0, 0},
{0, 0, 0, 0, 1, 0, 0, 0, 0, 0},
{0, 0, 0, 0, 1, 0, 0, 0, 0, 0},
{0, 0, 0, 0, 0, 0, 0, 0, 0, 0},
};
这样我们便可以用EFI_GRAPHICS_OUTPUT_PROTOCOL->Blt()这个函数将“十”一点一点画出来了。下面我们用字库生成工具生成一个,发现是这样的(选择不同的字体,字库会有不同的差异):
static const unsigned char bits[][20]=
{
//U+5341(十)
0x00,0x00,0x04,0x00,0x08,0x00,0x08,0x00,0x7F,0x80,0x08,0x00,0x08,0x00,0x08,0x00,
0x08,0x00,0x00,0x00,
};
整理一下:
static const unsigned char bits[][20]=
{
//U+5341(十)
0x00,0x00,
0x04,0x00,
0x08,0x00,
0x08,0x00,
0x7F,0x80,
0x08,0x00,
0x08,0x00,
0x08,0x00,
0x08,0x00,
0x00,0x00,
};
这是使用一个byte表示8个点,所以是这种写法,将16进制转换成2进制的话是一样的。一个byte不足表示一行10个点怎么办呢?那就再加一个byte,所以看到的数组每行有两个byte表示。
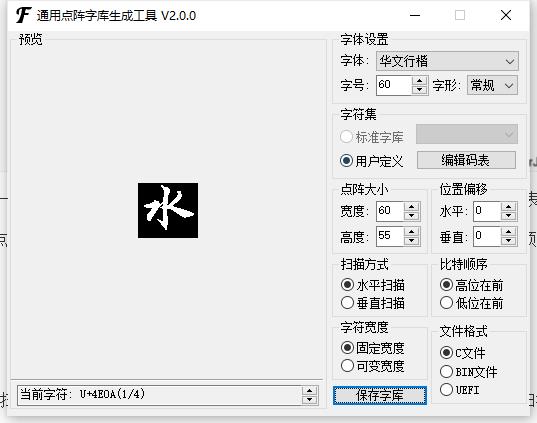
再看一下,将数组的第二行0x04,0x00转换为二进制后:0000 0100, 0000 0000,程序该怎么读取这个点呢?是从左边逐个取值(高位在前)还是右边逐个取值(低位在前)呢?顺序不一样,画出来的结果也是不同的。这个在生成工具是可配置的,如下图:

这里设置时高位在前,所以按从左到右逐个取值画图就可以了。工具还有一个扫描方式,水平扫描和垂直扫描,水平扫描是一行阵列组成n个byte,画点的时候是从左到右,而垂直扫描则是一列组成n个byte,按从上到下的顺序画点,我们按照默认设置即可。
实例1,画点阵字库
1). 使用字库生成工具,在编码表输入“上善若水”,配置如下图,然后保存字库,文件名为"FontLib.c"
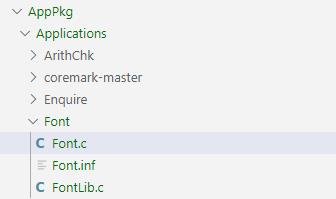
2). 在AppPkg新建一个Font模块,并将FontLib.c加入该文件夹,如图:
3). 打开FontLib.c,将数组前的static去掉,否则在Font.c将无法访问,编译出错,因为静态变量是无法跨文件访问的
4). Font.c程序如下:
#include  <Uefi.h>
#include  <Library/UefiLib.h>
#include  <Library/UefiBootServicesTableLib.h>
#include  <Protocol/GraphicsOutput.h>

#define FONT_HEIGHT 55
#define FONT_WIDTH 60
#define FONT_ARRAY_SIZE 440
#define FONT_LINE_COUNT (FONT_ARRAY_SIZE / FONT_HEIGHT)
#define FONT_COUNT 4

extern unsigned char bits[][440];

VOID DrawByte(
    EFI_GRAPHICS_OUTPUT_PROTOCOL *GraphicsOutput,
    UINT8 Byte,
    UINTN X,
    UINTN Y,
    EFI_GRAPHICS_OUTPUT_BLT_PIXEL Color
    )
{
    UINT8 i;

    for (i = 0; i < 8; i ++) {
        if (Byte & 0x80) {
            GraphicsOutput->Blt(GraphicsOutput, &Color, EfiBltVideoFill, 0, 0, X, Y, 1, 1, 0);
        }
        /* 从高位到低位逐个取值 */
        Byte <<= 1;
        X ++;
    }
}

VOID DrawFont(
    EFI_GRAPHICS_OUTPUT_PROTOCOL *GraphicsOutput,
    UINT8 *FontBitMap,
    UINT8 Height,
    UINT8 LineCout,
    UINTN X,
    UINTN Y,
    EFI_GRAPHICS_OUTPUT_BLT_PIXEL Color
    )
{
    UINT8 i, j;
    UINTN BackupX;

    BackupX = X;

    for(i = 0; i < Height; i ++) {
        X = BackupX;
        /* 画一行,每行8个byte */
        for(j = 0; j < LineCout; j ++) {
            DrawByte(GraphicsOutput, FontBitMap[i * LineCout + j], X, Y, Color);
            X += LineCout;
        }
        Y ++;
    }
}


int main (
  IN int Argc,
  IN char **Argv
  )
{
    EFI_STATUS Status;
    UINTN ScreenWidth, ScreenHeight, i;
    EFI_GRAPHICS_OUTPUT_PROTOCOL  *GraphicsOutput;
    EFI_GRAPHICS_OUTPUT_BLT_PIXEL ColorWhite = { 0xFF, 0xFF, 0xFF, 0 };
    EFI_GRAPHICS_OUTPUT_BLT_PIXEL ColorBlue  = { 0xFF, 0x00, 0x00, 0 };

    Status = gBS->LocateProtocol(&gEfiGraphicsOutputProtocolGuid, NULL, (VOID **) &GraphicsOutput);

    if (EFI_ERROR (Status)) {
        return EFI_UNSUPPORTED;
    }

    ScreenWidth  = GraphicsOutput->Mode->Info->HorizontalResolution;
    ScreenHeight = GraphicsOutput->Mode->Info->VerticalResolution;

    /* 将屏幕填充为白色 */
    Status = GraphicsOutput->Blt(
                    GraphicsOutput,
                    &ColorWhite,
                    EfiBltVideoFill,
                    0, 0,
                    0, 0,
                    ScreenWidth, ScreenHeight,
                    0
                    );

    for (i = 0; i < FONT_COUNT; i ++) {
        DrawFont(GraphicsOutput, bits[i], FONT_HEIGHT, FONT_LINE_COUNT, 100 + FONT_WIDTH * i, 100, ColorBlue);
    }

    return(0);
}
Font.inf
## @file
#  A simple, basic, EDK II native, "hello" application.
#
#   Copyright (c) 2010, Intel Corporation. All rights reserved.<BR>
#   This program and the accompanying materials
#   are licensed and made available under the terms and conditions of the BSD License
#   which accompanies this distribution. The full text of the license may be found at
#   http://opensource.org/licenses/bsd-license.
#
#   THE PROGRAM IS DISTRIBUTED UNDER THE BSD LICENSE ON AN "AS IS" BASIS,
#   WITHOUT WARRANTIES OR REPRESENTATIONS OF ANY KIND, EITHER EXPRESS OR IMPLIED.
#
##

[Defines]
  INF_VERSION                    = 0x00010006
  BASE_NAME                      = Font
  FILE_GUID                      = a912fa98-7f0e-4a03-b908-b757b806ec83
  MODULE_TYPE                    = UEFI_APPLICATION
  VERSION_STRING                 = 0.1
  ENTRY_POINT                    = ShellCEntryLib

#
#  VALID_ARCHITECTURES           = IA32 X64 IPF
#

[Sources]
  Font.c
  FontLib.c

[Packages]
  MdePkg/MdePkg.dec

[LibraryClasses]
  LibC

[Protocols]
  gEfiGraphicsOutputProtocolGuid
最后结果如下:

上面的演示中居然还能看到一点点动画效果,这是由于多个画点的原因导致的,效率较低。下面再按照我这篇文章所讲的->UEFI开发学习9 - 高效画图,修改下代码,如下:
#include  <Uefi.h>
#include  <Library/UefiLib.h>
#include  <Library/UefiBootServicesTableLib.h>
#include  <Protocol/GraphicsOutput.h>
#include  <Library/MemoryAllocationLib.h>

#define FONT_HEIGHT 55
#define FONT_WIDTH 60
#define FONT_ARRAY_SIZE 440
#define FONT_LINE_COUNT (FONT_ARRAY_SIZE / FONT_HEIGHT)
#define FONT_COUNT 4

extern unsigned char bits[][440];

VOID DrawByte(
    EFI_GRAPHICS_OUTPUT_PROTOCOL *GraphicsOutput,
    UINT8 Byte,
    UINTN X,
    UINTN Y,
    EFI_GRAPHICS_OUTPUT_BLT_PIXEL Color
    )
{
    UINT8 i;

    for (i = 0; i < 8; i ++) {
        if (Byte & 0x80) {
            GraphicsOutput->Blt(GraphicsOutput, &Color, EfiBltVideoFill, 0, 0, X, Y, 1, 1, 0);
        }
        /* 从高位到低位逐个取值 */
        Byte <<= 1;
        X ++;
    }
}

VOID DrawFont(
    EFI_GRAPHICS_OUTPUT_PROTOCOL *GraphicsOutput,
    UINT8 *FontBitMap,
    UINT8 Height,
    UINT8 LineCout,
    UINTN X,
    UINTN Y,
    EFI_GRAPHICS_OUTPUT_BLT_PIXEL Color
    )
{
    UINT8 i, j;
    UINTN BackupX;

    BackupX = X;

    for(i = 0; i < Height; i ++) {
        X = BackupX;
        /* 画一行,每行8个byte */
        for(j = 0; j < LineCout; j ++) {
            DrawByte(GraphicsOutput, FontBitMap[i * LineCout + j], X, Y, Color);
            X += LineCout;
        }
        Y ++;
    }
}

VOID DrawFontBuffer(
    EFI_GRAPHICS_OUTPUT_PROTOCOL *GraphicsOutput,
    UINT8 *FontBitMap,
    UINT8 Height,
    UINT8 Width,
    UINTN X,
    UINTN Y,
    EFI_GRAPHICS_OUTPUT_BLT_PIXEL Color
)
{
    EFI_GRAPHICS_OUTPUT_BLT_PIXEL *FontBuf;
    UINTN i, k;
    UINTN BitIndex, LineBit;

    BitIndex = 0;
    LineBit  = 0;

    FontBuf = (EFI_GRAPHICS_OUTPUT_BLT_PIXEL *) AllocateZeroPool (Height * Width * sizeof(EFI_GRAPHICS_OUTPUT_BLT_PIXEL));

    for (i = 0; i < FONT_ARRAY_SIZE; i ++) {
        for (k = 0; k < 8; k ++) {
            if ((FontBitMap[i] << k) & 0x80) {
                FontBuf[BitIndex] = Color;
            }
            BitIndex ++;

            if (++ LineBit == Width) {
                LineBit = 0;
                break;
            }
        }
    }
    GraphicsOutput->Blt(GraphicsOutput, FontBuf, EfiBltBufferToVideo, 0, 0, X, Y, Width, Height, 0);
}

int main (
  IN int Argc,
  IN char **Argv
  )
{
    EFI_STATUS Status;
    UINTN ScreenWidth, ScreenHeight, i;
    EFI_GRAPHICS_OUTPUT_PROTOCOL  *GraphicsOutput;
    EFI_GRAPHICS_OUTPUT_BLT_PIXEL ColorWhite = { 0xFF, 0xFF, 0xFF, 0 };
    EFI_GRAPHICS_OUTPUT_BLT_PIXEL ColorBlue  = { 0xFF, 0x00, 0x00, 0 };

    Status = gBS->LocateProtocol(&gEfiGraphicsOutputProtocolGuid, NULL, (VOID **) &GraphicsOutput);

    if (EFI_ERROR (Status)) {
        return EFI_UNSUPPORTED;
    }

    ScreenWidth  = GraphicsOutput->Mode->Info->HorizontalResolution;
    ScreenHeight = GraphicsOutput->Mode->Info->VerticalResolution;

    /* 将屏幕填充为白色 */
    Status = GraphicsOutput->Blt(
                    GraphicsOutput,
                    &ColorWhite,
                    EfiBltVideoFill,
                    0, 0,
                    0, 0,
                    ScreenWidth, ScreenHeight,
                    0
                    );

    for (i = 0; i < FONT_COUNT; i ++) {
        //DrawFont(GraphicsOutput, bits[i], FONT_HEIGHT, FONT_LINE_COUNT, 100 + FONT_WIDTH * i, 100, ColorBlue);
        DrawFontBuffer(GraphicsOutput, bits[i], FONT_HEIGHT, FONT_WIDTH, 100 + FONT_WIDTH * i, 100, ColorBlue);
    }

    return(0);
}
运行结果看不到任何延迟了,如下:

思考:结合上方的程序,如何将文字的背景色黑色改为其它颜色?
代码
https://gitee.com/ay123net/uefistudy
版权声明:
作者:bin
链接:https://ay123.net/mystudy/uefi/869/
来源:爱影博客
文章版权归作者所有,未经允许请勿转载。

共有 0 条评论